
Taking pictures of jewellery sucks!
The combination of small items, highly reflective metals and for many pieces, diamonds and coloured gemstones make it one of the most diffifuclt things to photograph.
Now I’m not a professional photographer but in the 7 years I spent running my online jewellery business, I spent hundreds of hours and a lot of money trying to figure out how to take good pictures and as I never had any complaints about a piece not looking like the picture, I must have been doing something right.
So in this post, I’m going to share some tips that I picked up along the way to hopefully help you take better pictures.
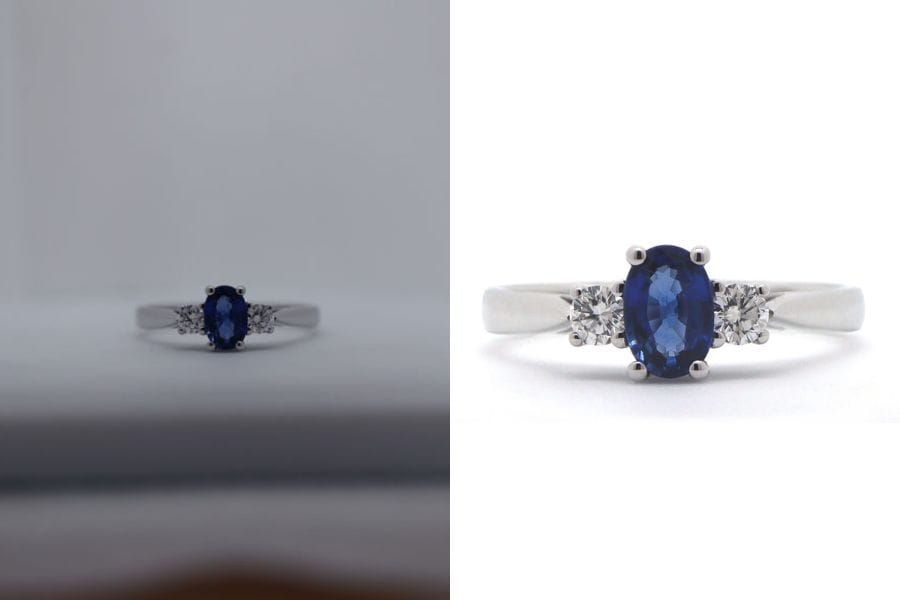
1: Camera vs Smartphone
First things first, should you use a proper camera or a smartphone for jewellery photography?
I’ve tried and had success with both but what I found was:
- For Product Images – a camera worked best due to:
- Having more control over the setting
- Easier to produce repeatable images, which makes post-production a lot easier
- Remote control (more on that later)
- Social Media Images – a phone, sometimes with a clip-on macro lens worked perfectly
The problem is that not any old camera will do, you specifically need one that allows you to change lenses, for the reason I will talk about next…
A Smartphone Will Do
If you don’t have the funds for a camera, a smartphone + clip-on macro lens will do the job and I used this setup for a couple of years but when possible, I do think it is best to upgrade to a dedicated camera.
2: Use A Macro Lens
In order to capture crisp, sharp images that show the fine details of your jewellery (which you need for product listings), you have to use a macro lens as normal lenses just aren’t designed for this kind of photography, whether you are using a camera or your smartphone.
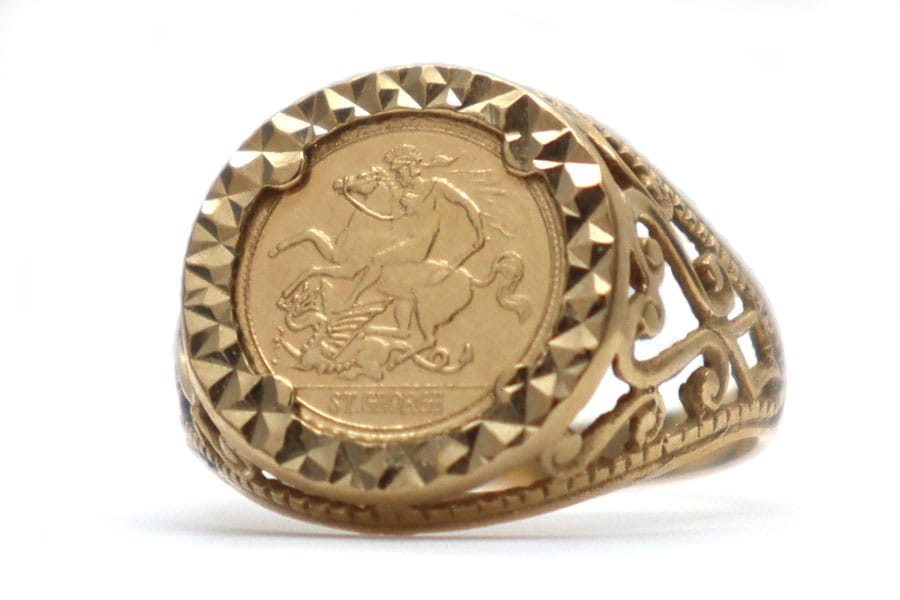
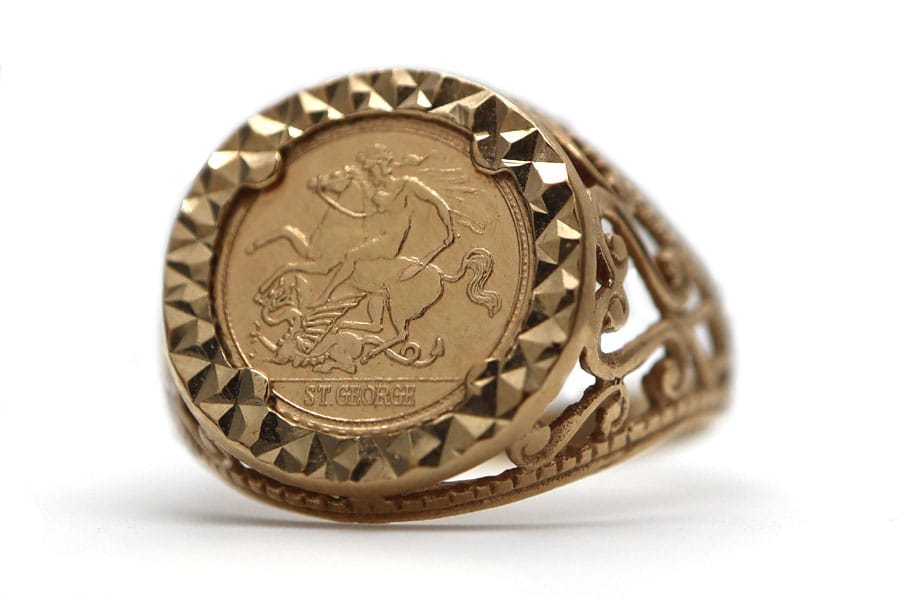
Just take a look at the two pictures above, at a quick glance they look ok but if you take a closer look:
- The first picture taken with a stock 15-45mm lens – it looks ok but some of the finer details are hard to make out, such as the St George at the bottom of the coin and some of the details around the coin and on the shoulder are a bit soft
- The picture taken with the macro lens – crisper details, the St George can easily be read and the detail is easier to see.
This might not seem like a lot but when lots of website builder have zoom or magnification options for product pages, this level of detail becomes very important.
The one big problem with macro lenses is that they aren’t cheap, my 28mm macro lens was over £200 and the top of the range ones such as the:
- Canon EF 100mm f/2.8L Macro
- Sony FE 90mm f/2.8 Macro
- Nikon NIKKOR Z MC 105mm f/2.8
Will all set you back over £500 but if it leads to more sales, it is worth the investment.
3: Adjust Your Camera Settings
Next up is the camera settings and most cameras come with some form of macro mode and for most people, this will do the job but if you really want to fine-tune things, then you want to play around with:
- Switching to manual mode
- Aperture settings – f/11 to f/16
- ISO – 100 to 200
- Shutter speed – 1/125 or slower with a tripod
- Manual focus
- White balance – avoid auto white balance and go for custom or daylight preset
- Switch to RAW file format – larger file size but allows for more control when editing
If you really want to delve into this, there are some really good guides out there from the professionals.
4: Use a Tripod
This is a must-have for jewellery photography, as you want your camera to be as stable as possible when taking pictures and I would recommend investing in a decent one that is sturdy, as many of the cheaper ones tend to flex quite a bit, which isn’t ideal and i’m talking from experience on that one.
5: Use Remote Shooting
This one has been a game changer for me and why I prefer cameras over smartphones as pretty much all the main camera brands like Canon and Sony have an app that allows you to control your camera from other devices, such as your phone or laptop (my prefferred option).
The reasons why remote shooting is better than doing it directly on your camera are:
- Larger screen – you can see so much more and this makes it easier to make sure the right things are in focus
- More stable pictures – this is the big one, as you don’t have to touch the camera to take the picture, increasing the chances of getting clear, crisp images that you can then edit
- Saves times – due to the reasons above, you can save time as you take less pictures but they are of higher quality
6: Use a Lightbox
Daylight is the best light source for taking pictures of jewellery but if you live in places where the quality of daylight can be hit and miss, such as here in the UK, you need to get yourself a lightbox.
There are plenty of options out there and I have tried everything from a £10 Ebay special, with halogen lamps to a £400 one with lots of settings and adjustments.
But I ended up using a cheap LED lightbox from Amazon. These come with either strips (I recommend the two-strip ones) or a circle of LED lights and while they aren’t perfect, they are a good starting point for having a consistent setting for taking pictures.
I haven’t tried any of the GemLightBox products as they are a bit out of my price range but have heard good things about them if you are looking for an all-in-one solution.
7: Use a Diffusor and Reflector
Why do you need a diffuser and a reflector?
The problem with a lot of the cheaper lightboxes is that they are open at the front and while this may be fine for taking pictures of other products, it isn’t great for jewellery and I’ll show you what I mean:
Lightbox Only:

This was taken just using the lightbox and while it doesn’t look too bad, you can see the reflection of the individual LEDs on the top of the Sapphire and quite harsh reflections on the prongs/claws.
Lightbox With Diffuser:

Can you see how much softer the light is on the piece now? No horrible reflections on the stone, much softer on the claws and the black reflections have also reduced. The Sapphire isn’t as dark and less black reflections in the Diamonds.
Lightbox With Diffuser and Reflector:

Can you see how much brighter the Diamonds look? The colour of Sapphire is also slightly lighter, bringing it closer to its actual colour. There is also less reflection on the tips of the claws/prongs.
These two additions to the lightbox can make a huge difference to the quality of your jewellery images.
8: Use Photo Stacking
Taking pictures with a macro lens is great as it allows you to pick up on the small details that is you need to show in a piece of jewellery but it does come with its challenges.
Other than the background not being perfectly white, can you see an issue with this picture?
The shank is out of focus, this is because macro lenses have a very shallow depth of field and results in very sharp areas with lots of details and areas that are out of focus.
To counter this, you need to do something called focus stacking and the basic premise of this is to take multiple photos, with each on being focused on a different area and then merging these together to create 1 image that is completely in focus.
This is where using a camera, tripod and remote shooting really come in useful as with the remote viewing, I could easily move the focus point on the camera, clearly see what I was focusing on (as I was looking at it on my laptop screen) and take multiple pictures without having to touch the camera and risk moving it.
To do the focus stack for this ring, I took two additional pictures to the one above:

With the second image, the Sapphire is now out of focus but the area where the head meets the shank is much sharper.

The third image has the ring shank in focus and the stones and head are completely out of focus.
Once you have all your images, you need to merge them together and for this you are going to need some editing software. I used Photoshop but you can also use online tools like Photopea.
After focus stacking the images, I then had a much better picture of the ring, with the stones, head, shoulders and shank all in focus:

I used three images to use as an example for this post, in practice, it isn’t unusual to take between 6 and 12 pictures.
9: Learn How To Edit
This is the bit that most people hate but unfortunately, even with the best setup, you aren’t going to have website-ready images directly from the camera (even the professionals can’t do this).
When it comes to editing, outside of the photo stacking, there are two main things that I focus on:
1. Making The Background White
As you can see in the images above, the background is grey and I want it to be white.
To do this, I avoid using any auto tools like Auto Contrast or Auto Color as they can throw up some really strange results.
I prefer to use the Curves tool and find that it can correct the background and sort the colour of metal and stones in 1 or 2 clicks.
There are three options:
- Set Black Point
- Set Grey Point
- Set White Point
I use the White Point option and then click on a lighter area of the image, it then adjusts the colours based on that point.

I might have to click a couple of different areas until I find the sweet spot.
I would recommend messing about with this tool and seeing how colours change based on clicking lighter and darker areas, it is quite hard to describe how this tool works, so actually trying it is the best option.
Don’t Use Background Removal Tools
Many people opt for this as a quick way to get a white background but they often struggle with highly reflective metals, diamonds and gemstones. They also remove the shadow, which I think makes the images look more realistic.
2. Fixing Imperfections
Once I have got the background and colours sorted, it is time to fix the imperfections in the image as it doesn’t matter how much you clean or prep, there will always be a small fibre or something that shows up on your pictures.
That is where the spot heal tool comes in and I noticed a couple of imperfections with this image:

- A bit of fluff just under the ring
- A dark spot on the shank
- A line on the metal that shows a slight difference in colour (this is from where the paper diffuser meets the acrylic)
With the spot heal tool, I removed the fluff and spots and then blended the line to make the two different colours less obvious.
I also used the eraser tool with a soft edge to take the shadow back a little bit and stop if having a hard edge at the bottom (this wouldn’t matter for a product image as I would use square images, rather than the rectangular ones I have in this post).
The result of this is:

10: Try Using Different Backgrounds
You don’t have to use white backgrounds (unless the marketplace you are selling on requires it) and from my experience, some backgrounds can be a lot easier to use.
Over the years, I have tried many different backgrounds, including slate, wood and marble, amongst many others but one thing I would say is that you don’t want the background to take away from the piece.
I took a couple of pictures to demonstrate this:

This picture was taken on top of a wooden ring box that has a polished finish and while I think it looks good, the colour of the wood kind of overpowers the picture.

This one is taken using black leatherette as the background and I think this is a lot better as it doesn’t overpower the ring.
One of the benefits I found with using these types of backgrounds is the lack of editing required, other than being cropped, these haven’t been edited in any way.
Which sounds perfect right? But, if you are taking pictures of pieces with different metals or stone colours, you will have to do some editing to ensure that the background looks the same in all of your pictures.
11: Taking Pictures Of Pendants/Necklaces
When I was selling jewellery, over 80% of the pieces I sold were necklaces and pendants and I tried lots of different options, including:
- Hanging the piece from something
- Using a display bust
- Using a frosted acrylic earring/necklace display
But the pictures just never came out right, either the piece didn’t hang properly or I would get weird shadows or reflections.
The answer? Lie the piece flat and take the picture through the top of the light box.
Hanging

Lying Flat

I hope you can see the difference between these two images, the one hanging from the display stand has some wierd shadows, which makes the details at the bottom of the pendant hard to see and the diamonds don’t stand out at all.
When laid flat and pictured from above, the pendant is much clearer.
When it comes to editing, I take a slightly different approach as the curves tool doesn’t give the same results as it does for the ring, so what I did was:
- Adjusted the brightness and contrast to make the stone a bit lighter (it is a dark Ruby)
- Used a background remover to create a white background

I would have been very happy with this picture as it shows off all the details of the pendant, for a product listing, I would also look to do an angled or side-on shot to give anyone viewing it a better idea as to what it looks like.
For the side-on shot, I would do it in a similar way to how I did the ring picture.
I would use a similar approach for taking pictures of earrings.
Conclusion
Jewellery photography is hard and even in the world of professional photography, it is a specialised skill due to the complexities of it.
But I hope that I have given you some ideas to go and try and be prepared for lots of trial and error (it’s taken me over 10 years to get this point) but if I can speed the process up for you, then this post has been worth making.

I'm Paul Haywood FGA DGA, the owner and founder of Haywoods Gems, I'm a fully qualified Gemmologist and Diamond Grader from the Gemmological Association of Great Britain.